
Adding Blast Network to MetaMask is easy and secure. You can connect it either manually or automatically via Chainlist.org. Both methods let you access Blast’s Layer-2 ecosystem safely.
Table of Contents
You can choose which method you like best. We’ll go over these methods one by one.
What Is the Easiest Way to Add Blast Network to MetaMask?
The easiest way is through Chainlist.org, which connects verified blockchain networks directly to MetaMask.
If you prefer full control, use the manual setup by entering network details yourself.
| Method | Type | Skill Level | Time |
|---|---|---|---|
| Manual | Custom setup | Intermediate | 3–5 minutes |
| Automatic (Chainlist) | One-click connection | Beginner | 1–2 minutes |
How Do You Add Blast Network Manually in MetaMask?
Manual addition gives you control over network configuration and source validation.
Steps to Add Manually
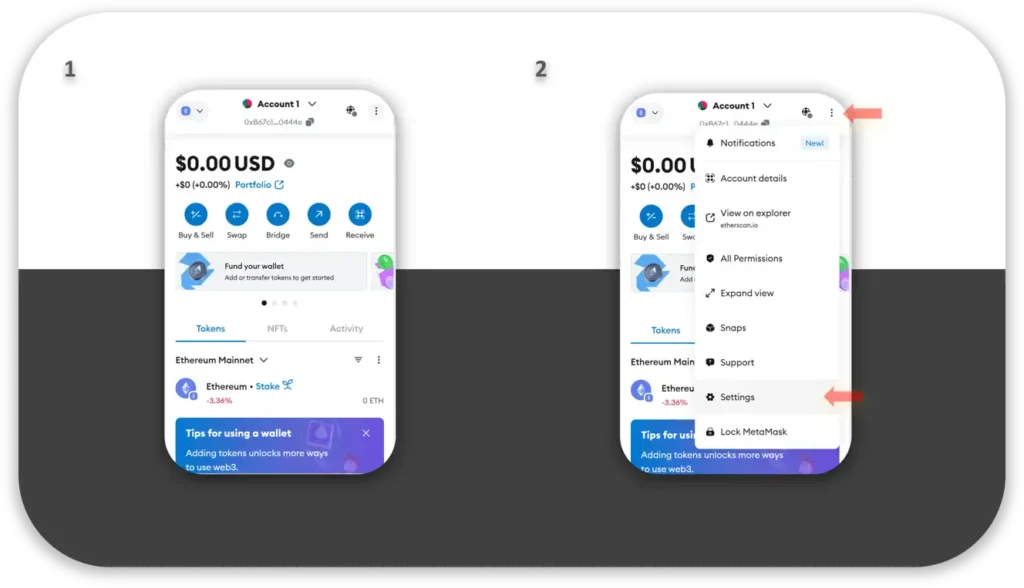
- Open MetaMask
- Click three dots on top right, goto settings>network
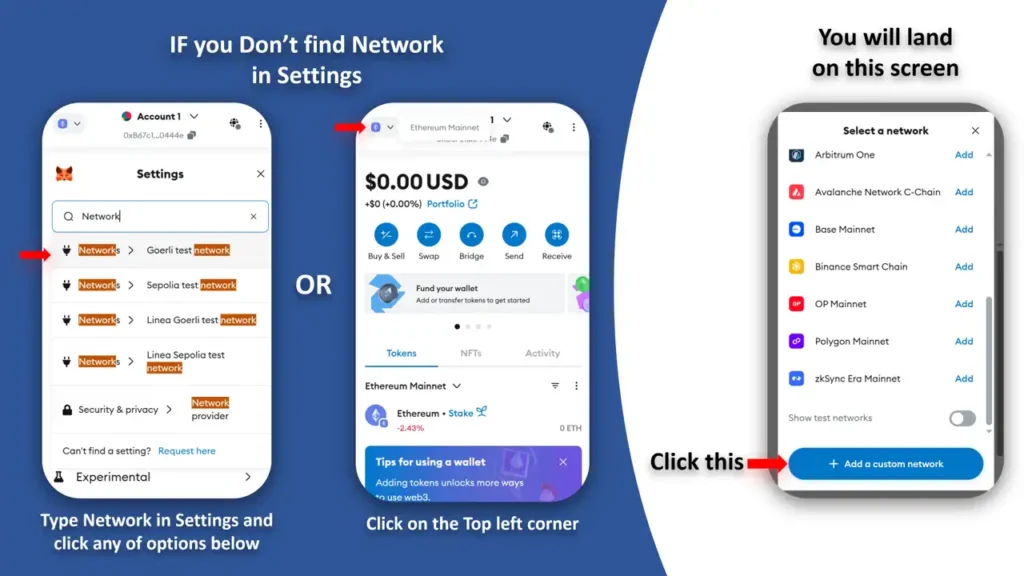
- Goto Network at Top left corner, select Networks and click Add Network.
- Click on “Add a custom network” to open a new window. A new window will appear.
- Open a new browser tab and navigate to the official website of Blast.io
- Find the network information needed for MetaMask.
- MetaMask allows you to paste the information into each field.
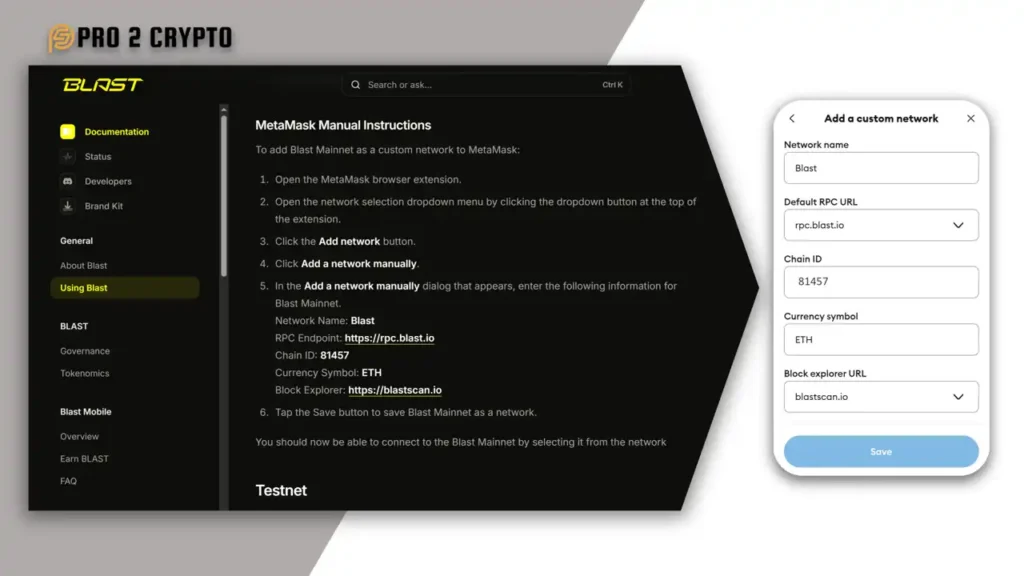
- Click Save after you have entered all the information correctly.
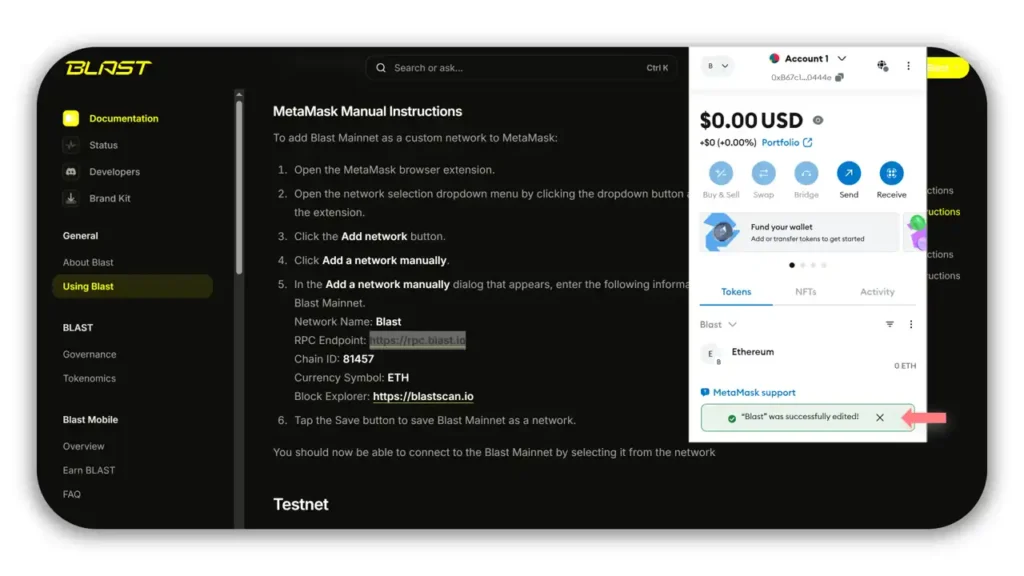
That’s it! You have now successfully added the Blast Network to MetaMask.
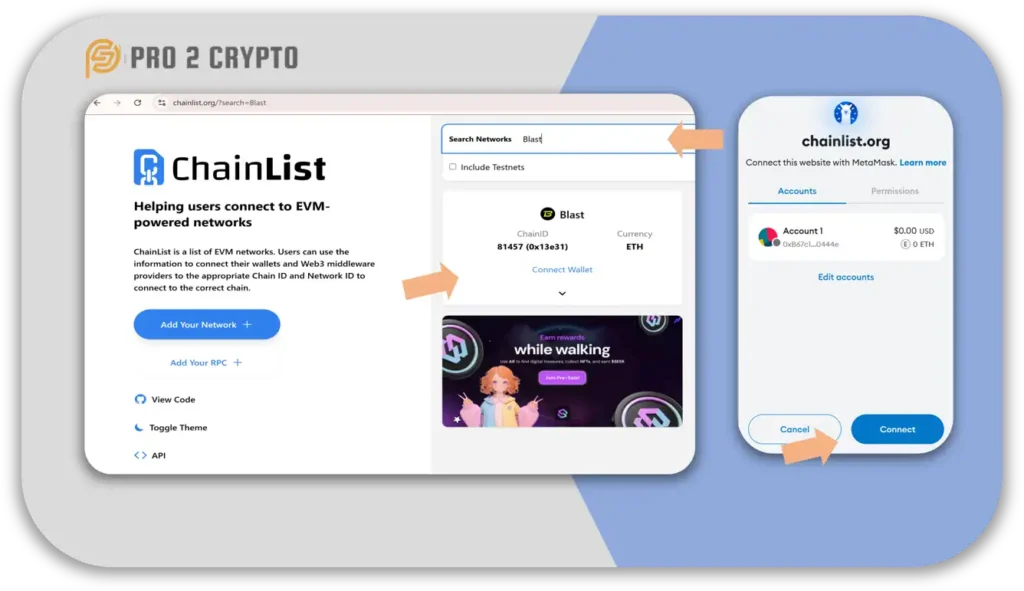
How Can You Add Blast Network Automatically via Chainlist?
The automatic method uses Chainlist.org, a verified network repository that simplifies MetaMask integration.
Steps to Add via Chainlist
- Go to Chainlist.org.
- To link MetaMask, click on “Connect wallet”.
- Type Blast in the search box and hit Enter.
- Click on “Add to MetaMask”. You’ll see an option to “Add to MetaMask”.
- MetaMask will notify you and ask for your approval.
- The Blast is now added by clicking Approve.
It is a simple, efficient method that you can use if your network information doesn’t need to be manually entered. Some people do not want to link their wallets with third-party websites. You can still use manual methods if you prefer.
Is It Safe to Connect MetaMask with Chainlist?
Yes — Chainlist is considered safe because it lists verified chain data.
However, always confirm the domain (https://chainlist.org) before connecting.
If you prefer not to link with third-party sites, use the manual setup instead.
How Can You Switch Between Networks in MetaMask?
MetaMask allows switching between Ethereum, Blast, and Binance Smart Chain easily.
Steps to Switch Networks
Blast defaults to Ethereum, as it is a layer 2 network. You can switch to Ethereum or Binance Smart Chain at any time by following these simple steps.
- Open MetaMask
- Select the network dropdown on the left.
- Choose Binance Smart Chain, Ethereum Mainnet or another network.
- Select Blast from the list if you wish to return.
Switching networks is easy.
Why Should You Add Blast Network to MetaMask?
Blast is an Ethereum Layer-2 network optimized for scalability and low fees.
| Advantage | Description |
|---|---|
| Lower Gas Fees | Transactions cost less than on Ethereum Mainnet. |
| Fast Confirmation | Layer-2 rollup design improves transaction speed. |
| EVM Compatibility | Works with all Ethereum dApps. |
| Security | Inherits Ethereum-level security and validation. |
Outcome: Better speed, lower cost, and seamless dApp access.
Blast Network + MetaMask Setup Summary
| Category | Details | Key Insight |
|---|---|---|
| Purpose | Connect Blast Network to your MetaMask Wallet | Enables access to Blast’s Layer-2 ecosystem for faster, cheaper transactions. |
| Available Methods | 1️⃣ Manual setup 2️⃣ Automatic via Chainlist.org | Both verified and secure — use official URLs only. |
| Manual Method Steps | Settings → Networks → Add Network → Enter Blast details from Blast.io | Full control over network configuration and validation. |
| Automatic Method Steps | Visit Chainlist.org → Connect Wallet → Search “Blast” → Add to MetaMask | One-click connection using verified chain data. |
| Switching Networks | Click MetaMask dropdown → Select Ethereum, BSC, or Blast | Instant switch between Layer-1 and Layer-2 environments. |
| Advantages | Low Gas Fees | High Speed | EVM Compatibility | Perfect for DeFi, NFTs, and bridging ETH. |
| Safety Notes | Verify URLs and never share your seed phrase. | Always confirm https://blast.io and https://chainlist.org links. |
| After Setup | Explore Blast.io dApps and bridge ETH to Blast. | Start earning with Layer-2 DeFi protocols. |
| Difficulty Level | Beginner Friendly (2–5 minutes) | No coding required — only wallet access and approval. |
| Recommended Resources | How to Bridge ETH to Blast | Top DeFi dApps on Blast | Expand activity within the Blast ecosystem. |
What Should You Do After Adding Blast to MetaMask?
Once connected, you can:
- Explore the Blast.io ecosystem (DeFi, NFTs, and bridges).
- Bridge ETH to Blast using official transfer tools.
- Test new Layer-2 dApps and services for reduced fees.
Always verify you’re using official Blast.io URLs to protect your wallet and funds.
Last Thoughts
It’s that simple! The Blast is now set up on your MetaMask Wallet. You can now explore the ecosystem by using either Blast.io or the chainlist.
In order to make it easier for you, I have included in the following description a link that will take you directly to the Blast.io official website. You’ll get the right network information from a trustworthy source and not third-party sites.
Thank you for reading
Check out our Step-by-step guide on How To Transfer and bridge ETH to Blast
Want to explore more crypto guides and tools?
Return to Pro2Crypto Main Page